In the ever-evolving world of iOS app development, SwiftUI has emerged as a game-changer, simplifying the process of designing and building apps. Since its introduction by Apple in 2019, SwiftUI has continuously evolved, and in 2024, it stands out as a powerful tool that developers can’t afford to overlook. Let’s dive into how SwiftUI is revolutionising iOS app design and development.
SwiftUI is a modern framework provided by Apple for building user interfaces across all Apple platforms using the Swift programming language. It offers a declarative syntax, which means developers can describe how their user interfaces should look and behave, and SwiftUI takes care of the rest. This approach contrasts with the traditional imperative programming style, where developers have to write detailed code for each UI element’s behavior.
Key Features of SwiftUI
Declarative Syntax: SwiftUI’s declarative syntax allows developers to write less code while achieving more. By simply declaring what the UI should look like, developers can focus on the design and logic rather than the implementation details.
Live Previews: With SwiftUI, Xcode provides real-time previews of the user interface, enabling developers to see changes instantly as they code. This feature speeds up the development process and allows for quicker iterations.
Cross-Platform Compatibility: SwiftUI works seamlessly across all Apple platforms, including iOS, macOS, watchOS, and tvOS. This means developers can write a single codebase and deploy it across multiple devices, saving time and effort.
Integration with UIKit: For existing projects built with UIKit, SwiftUI offers easy integration, allowing developers to adopt it incrementally without needing a complete rewrite.
Animations and Transitions: SwiftUI simplifies the creation of complex animations and transitions, making apps more engaging and visually appealing.
Benefits of Using SwiftUI
1. Increased Productivity
The declarative nature of SwiftUI reduces the amount of code developers need to write, leading to faster development cycles. Live previews in Xcode further enhance productivity by allowing developers to see immediate feedback on their changes.
2. Consistency Across Platforms
SwiftUI’s ability to work across all Apple devices ensures a consistent user experience. Developers can create unified interfaces that adapt to different screen sises and resolutions without extra effort.
3. Easier Maintenance
With SwiftUI, the codebase is cleaner and more maintainable. The separation of concerns between design and logic makes it easier to manage and update the app as needed.
4. Future-Proof Development
SwiftUI is Apple’s future direction for UI development. By adopting it now, developers position themselves to take full advantage of future updates and enhancements, ensuring their apps remain up-to-date with the latest technologies.
Real-World Applications of SwiftUI
Several high-profile apps have already adopted SwiftUI, demonstrating its capabilities and benefits. For instance, the Apple News app and various other in-house apps by Apple leverage SwiftUI for a seamless user experience and efficient development process.
For developers looking to dive into SwiftUI, Apple provides extensive documentation and tutorials. Additionally, numerous online courses and community resources are available to help both new and experienced developers get up to speed with this powerful framework.
Conclusion
SwiftUI is not just a trend; it’s a transformative approach to iOS app development that simplifies design and coding processes while offering powerful features and benefits. As we move further into 2024, embracing SwiftUI will be crucial for developers aiming to create efficient, consistent, and future-proof iOS applications.
Xcode is the official integrated development environment (IDE) provided by Apple for iOS app development. It offers a comprehensive suite of tools for building, testing, and debugging iOS applications. Key features include:
Code editing with syntax highlighting and autocompletion.
Interface Builder for designing app interfaces.
Integrated testing and debugging tools.
Simulator for testing apps on virtual iOS devices.
Support for Swift and Objective-C programming languages.
2. Swift
Swift is Apple’s modern, open-source programming language designed for building iOS, macOS, watchOS, and tvOS applications. Swift is known for its readability, performance, and safety features. It has gained popularity among iOS developers due to its ease of use and efficiency.
3. CocoaPods and Carthage
CocoaPods and Carthage are dependency management tools for iOS app development. They make it easy to incorporate third-party libraries, frameworks, and components into your projects. These tools help streamline the integration of external code and resources, saving development time and effort.
4. Interface Builder
Interface Builder is a visual design tool within Xcode that allows developers to create user interfaces for iOS apps without writing extensive code. It offers drag-and-drop functionality for designing app screens, defining user interactions, and connecting UI elements to code.
5. TestFlight
TestFlight is Apple’s platform for distributing beta versions of iOS apps to testers. It enables developers to collect feedback, identify issues, and refine their apps before releasing them to the App Store. TestFlight is a valuable tool for quality assurance and user testing.
6. Instruments
Instruments is a powerful performance analysis tool provided by Xcode. It helps developers identify and resolve performance issues in their iOS apps. With Instruments, you can profile CPU usage, memory allocation, and other aspects of your app’s performance.
7. Git and Version Control
Git is a widely used version control system that helps manage source code changes and collaborate with team members. Tools like GitHub, GitLab, or Bitbucket provide hosting services for your iOS app’s code repositories. Version control is essential for tracking changes, collaborating, and maintaining a history of your app’s development.
While Xcode is the primary IDE, some developers prefer using code editors such as Visual Studio Code or Sublime Text for code editing, especially when working on cross-platform projects or utilising languages other than Swift or Objective-C.
10. App Store Connect
App Store Connect is Apple’s platform for managing your iOS app’s presence on the App Store. It allows you to submit apps for review, manage app metadata, monitor user reviews, and view app analytics and financial reports.
Conclusion
iOS app development requires a robust set of tools to create high-quality, user-friendly applications. The tools mentioned above, from Xcode and Swift to Interface Builder, TestFlight, and Git, are essential for the development, testing, and distribution of iOS apps. Leveraging these tools, developers can create innovative and reliable applications that meet the high standards of the Apple ecosystem and deliver outstanding user experiences.
In the fast-paced world of iOS app development, incorporating real-time features and seamless user experiences is crucial. Firebase, a cloud-based platform by Google, has emerged as a powerful tool for iOS developers to build apps with real-time functionality, efficient data storage, and robust authentication. In this article, we will delve into the capabilities of Firebase for iOS and how it empowers developers to create dynamic and responsive apps that delight users.
What is Firebase? Firebase is a comprehensive mobile and web development platform that offers a range of cloud-based services and tools. It allows developers to build, test, and deploy apps quickly while also providing features to improve user engagement, data management, and app performance.
Real-Time Database: One of the standout features of Firebase is its real-time database. This NoSQL database enables developers to synchronize data in real time across different clients and devices. This is ideal for chat apps, collaborative tools, and any application where real-time updates are critical.
Authentication and User Management: Firebase offers robust authentication services that allow developers to add secure user sign-up, sign-in, and access control to their apps. This eliminates the need to build authentication systems from scratch, saving time and ensuring user data security.
Cloud Functions: Firebase Cloud Functions allow developers to execute server-side code in response to various events triggered by the app. This is useful for automating tasks, sending notifications, and integrating with external services.
Cloud Storage: Firebase provides cloud storage for app data, user-generated content, images, videos, and more. This simplifies data storage management and ensures scalability without worrying about infrastructure management.
Dynamic Links: Firebase Dynamic Links enable developers to create deep links that direct users to specific content within the app. These links are cross-platform and can work across iOS, Android, and web.
Performance Monitoring: With Firebase Performance Monitoring, developers can analyze app performance and identify bottlenecks, crashes, and slow interactions. This helps improve app responsiveness and user experience.
Crashlytics: Firebase Crashlytics is a powerful crash-reporting solution that provides insights into app crashes and their impact on users. It helps developers identify and fix issues promptly, ensuring app stability.
Analytics and A/B Testing: Firebase Analytics offers in-depth insights into user behavior, allowing developers to make informed decisions for app improvement. A/B testing features enable testing different app variations and determining the most effective ones.
Easy Integration: Firebase offers easy integration with iOS apps through its comprehensive SDK. It seamlessly connects with popular development environments like Xcode, making it user-friendly for iOS developers.
Conclusion:
Firebase has emerged as a go-to platform for iOS developers seeking to create feature-rich, real-time apps with streamlined user experiences. With its suite of cloud-based services, including real-time databases, authentication, cloud storage, and analytics, Firebase empowers developers to focus on building engaging applications rather than managing complex backend infrastructure. By leveraging Firebase, iOS developers can deliver apps that are not only dynamic and responsive but also user-centric, enhancing user satisfaction and driving app success in the competitive app ecosystem.
Are you thinking about having an app for your business? That’s an excellent idea as there is no better medium to enhance your business outreach in 2022. Now the good news is you can find many mobile app development companies in the market to build your business app.
But the most crucial decision you need to make is which portal you would get your app developed upon. As of now, there are two major mobile App development platforms available in the market that are Android and iOS and there is tough competition between them.
Let’s have a look at these two platforms so that you can decide which would be most complimentary for your business model.
Android app development platform
ADVANTAGES
Easy to use: when compared to other app development platforms like iOS, it is easier to learn to use android. The main reason is that Google the owner of the platform mainly focuses on providing resources through which those who are new to android devices can learn to operate quite easily.
Highly adaptable. One of the key advantages android offers is the flexibility it provides in development with minimal restrictions. Moreover, the android application can run on any given android device adding to the same.
Learning Curve: when compared to other development platforms like iOS, it is easier to learn android. The reason is that Google the owner of the platform goes out of its way to provide resources through which beginners can learn to operate the OS.
App deployment: With the recent change of policy in the year 2020, Google offers one of the easiest methods of app deployment it has become very easy for android app development companies to publish an app on Android.
DISADVANTAGES
Security issues. Android mobile app development platform is an open-source platform which makes it more prone to cyberattacks as compared to iOS which isn’t open-source, android is considerably less secure.
Quality standard: one of the main challenges with android app development is fragmentation. Although there have been arguments that it allows developers to create multiple apps at the same time, admitted it might complicate the process to another level.
User Engagement. It has been observed that android users are more attracted to free applications and spend less to no making in-app purchases.
iOs app development platform
ADVANTAGES
Performance. iOS never compromises when it comes to performance making it fast, reliable, and easy to use. And this can also be seen in all the mobile applications that are developed from this platform.
Apple ecosystem. This point can be viewed both as an advantage or a disadvantage. However, from a technical point, it’s the best thing a company can do for their customers. Apple ecosystem allows seamless connection between a variety of Apple devices.
Aesthetics. iOS developers get a lot of guidance from apple when it comes to creating the user interface. The reason is that iOS is a platform that captures its users with visually pleasing UI/UX, and its apps are no different.
DISADVANTAGES
Customisation. Since Apple is adamant about its style the customisation of apps becomes a lot harder this is one of the reasons why it can be somewhat difficult to hire iPhone app developers.
App publishing. The App store of iOS can be more demanding than its android counterpart. Even if you make sure your app doesn’t break any major protocols, it might still not be enough for it to be selected.
Restrictive environment. When compared to android, the iOS development environment is a lot more regulated and rigid.
Summing it up
We hope you found our comparison between iOS and android application development useful. But only you can decide which one is best for your business. In case you have any questions or need help in mobile app development, you can book a 30 minutes free session with us and we’d be delighted to help you out in any way we can.
Swift as a programming language was brought to the limelight in the year 2014. Swift has transformed the complex practice of programming mobile app developmentinto an easy to write, learn and understand proposing the up to date features. Designed by Apple INC, Swift is specifically developed to facilitate iOS programming for products running on iOS platform. It is loaded with LLVM compiler that features C, C++, Objective-C and Swift code to run within one program. Swift is very friendly to program developers as it supports backgrounds, a unique which feature which allows the iOS developer to edit the script codes and generates result immediately without running the app again. Google has also announced her intention for using Swift as a first-class language for its Android app development. Here we present you some of the practices and tips followed by Toptal developers to make iOS app development easy.
A Dose of Insight: “Toptal is a community of designers and designers who are dedicated to exchanging services to companies, to each other as well as to the community as a whole. The members of Toptal are considered as the top 3 percent amongst all the designers and developers in the world.”
Before we delve into the world of Swift development, one needs to understand the defining elements as well as the differences between objects, interfaces, and model classes.
QL Tech Trivia 101:
Object: In the world of software development, an object is an entity within the coded structure of an application. It is a group or arrangement of data and functions that help in defining specific aspects of the functioning of the application.
Class: The methods along with the variables that are a part an object make up the class of the object. They can be divided on the basis of the methods and variables that are considered.
Interface: This is the part of the application in which only the declarations from the object are visible and utilized. This means that an interface essentially displays or makes use of the output born from objects and the arrangement of classes in an application.
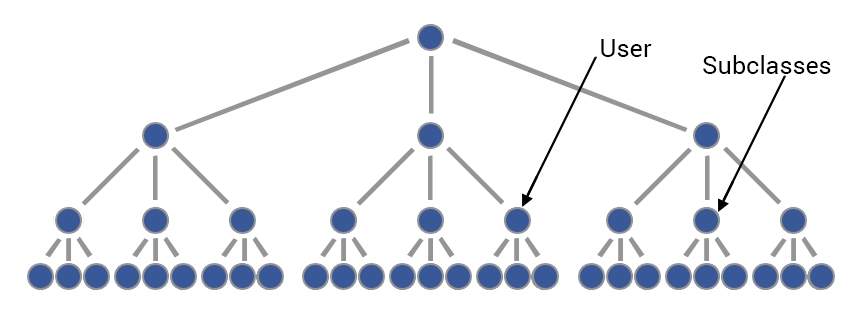
In the above image, more than one object has same common binding to accelerate the working efficiency. The reuse of the same code is a sensible idea, as introduced by Swift. For example using a verbatim code language Protocol Extensions to Bind Model classes with interfaces can be understood as under:
Let’s suppose we have a ‘User’ class:
class User {
var name = “”
var email = “”
var bio = “”
var image: UIImage? = nil
init(name: String, email: String, bio: String) {
self.name = name
self.email = email
self.bio = bio
}
}
Gradually a protocol will implement all the interfaces together that would be bind with the ‘User’ instances calling it ‘UserBindable’.
protocol UserBindable: AnyObject { var user: User? { get set }
var nameLabel: UILabel! { get } var emailLabel: UILabel! { get } var bioLabel: UILabel! { get } var imageView: UIImageView! { get } }
Here ‘User’ as an individual variable is a user (operator) to bind and all other ‘UIView’ the subclasses use to bind the user. The image below will clarify the above code understanding:
Now, let’s we create a protocol extension: extension UserBindable {
// Make the views optionals
var nameLabel: UILabel! { return nil }
var emailLabel: UILabel! { return nil }
var bioLabel: UILabel! { return nil }
var imageView: UIImageView! { return nil }
// Bind
func bind(user: User) { self.user = user bind() }
func bind() {
guard let user = self.user else { return }
if let nameLabel = self.nameLabel { nameLabel.text = user.name }
if let bioLabel = self.bioLabel { bioLabel.text = user.bio }
if let emailLabel = self.emailLabel { emailLabel.text = user.email }
if let imageView = self.imageView { imageView.image = user.image } } }
Here the extension is divided into two parts:
Default Value created that allows some exclusion and some inclusion.
All the values of user properties and fix to view.
Presenting a user list, create a ‘UITableViewCell’.
class UserTableViewCell: UITableViewCell, UserBindable {
var user: User?
// we can set the labels in interface builder or with by code. @IBOutlet weak var nameLabel: UILabel! @IBOutlet weak var emailLabel: UILabel! }
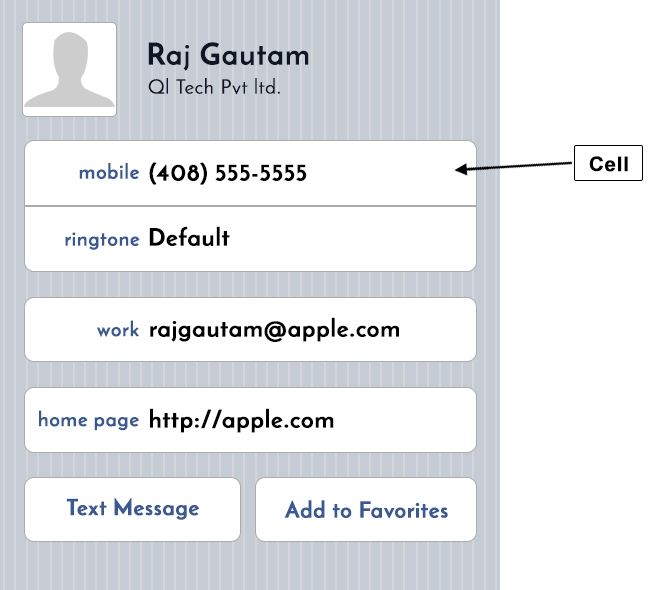
The above image indicates that the cell is binding the user through the use of the UserBindable protocol. This binds its interface to the user object.
In the UITableViewDataSource protocol, we can see the following object classes:
func tableView(tableView: UITableView, cellForRowAtIndexPath indexPath: NSIndexPath) -> UITableViewCell { let cell = tableView.dequeueReusableCellWithIdentifier(“Cell”) as! UserTableViewCell let user = // find the user from your array or whatever cell.bind(user) return cell }
If we want to show the detail of this user after touching it, we can have a view controller like this:
class UserDetailViewController: UIViewController, UserBindable {
var user: User?
@IBOutlet weak var nameLabel: UILabel! @IBOutlet weak var emailLabel: UILabel! @IBOutlet weak var bioLabel: UILabel! @IBOutlet weak var imageView: UIImageView!
override func viewDidLoad() { super.viewDidLoad() // here we suppose that we have set the user value before the viewDidLoad bind() } }
Thus, the above example codes shown the efficient use and output of reused binding code in android mobile app development.
Use `NSDateFormatter` efficiently
Creating NSDateFormatter is a tedious job for any android programmer. But one thing that is to be notified here is that all the formatters to be used in the app are static constant. They can be reused and no need to create them again and again. The image below is an example of showing static constant:
Here in the above image the day changes but the formatters remain constant. Like the name of days, 12-hour format, the name of months and numbers from 0-9.
The example of the code is as follows:
extension NSDateFormatter {
@nonobjc static let shortDateAndTime: NSDateFormatter = { let formatter = NSDateFormatter() formatter.dateStyle = .ShortStyle formatter.timeStyle = .ShortStyle return formatter }()
@nonobjc static let dayMonthAndYear: NSDateFormatter = { let formatter = NSDateFormatter() formatter.dateFormat = “MM/dd/yyyy” return formatter }()
@nonobjc static let monthAndYear: NSDateFormatter = { let formatter = NSDateFormatter() formatter.setLocalizedDateFormatFromTemplate(“MMMyyyy”) return formatter }() }
Now in the above code, we can make out @nonobjc attribute. This means that the value is supposed to be added in the cell. A complaint of ‘A declaration cannot be both ‘final’ and ‘dynamic’.‘ is seen. If the formatter has applied for “DD/MM/YYYY” format, then the date should be “01/01/2000”. No object can be added (“001”) nor can be deducted (“1”). Similarly, notice that adding the @objc will make your extension incompatible with Objective-C.
Next, let’s we create an NSDate extension to make a simple API convert to strings and back:
extension NSDate {
/// Prints a string representation for the date with the given formatter func string(with format: NSDateFormatter) -> String { return format.stringFromDate(self) }
/// Creates an `NSDate` from the given string and formatter. Nil if the string couldn’t be parsed convenience init?(string: String, formatter: NSDateFormatter) { guard let date = formatter.dateFromString(string) else { return nil } self.init(timeIntervalSince1970: date.timeIntervalSince1970) } }
Let’s call the NSDate extension methods.
To create a String from a NSDate:
let date = NSDate()let string = date.string(with: .shortDateAndTime)// let string = date.string(with: .dayMonthAndYear)// let string = date.string(with: .monthAndYear)
To create a NSDate from a String
let string = “06/17/2016” let date = NSDate(string: string, formatter: .dayMonthAndYear)
By looking at the several techniques and coding customizability that Swift provides, developers can have a field day with the process of iOS application development. This article barely gives a glimpse at the gates of the opportunity that Swift throws open for developers and designers. Would you like to know more, or would you be feeling the urge to share your inputs? Let us know so that we can explore the realm beyond the gates of opportunity together.